Remove Ads by SpeedyCar from Firefox : Block Ads by SpeedyCar
These dll files happen to infect because of Ads by SpeedyCar npwmsdrm.dll 0, netplwiz.dll 6.0.6000.16386, mqrt.dll 5.1.2600.0, msscntrs.dll 7.0.7600.16385, halacpi.dll 6.0.6002.18005, setupapi.dll 6.0.6000.16609, tsgqec.dll 6.0.6002.22146, compstui.dll 6.1.7600.16385, NlsData0002.dll 6.0.6000.16710, rsca.dll 7.0.6000.16386, kbdhept.dll 7.0.5730.13, hpzsew71.dll 0.3.7071.0Easy Steps To Uninstall Ads by SpeedyCar From Infected Operating System
Ads by SpeedyCar is deemed as Operating System malware which is programmed to destroy your data and other important documents stored on Operating System. This type of malware enter your Operating System in many ways. It generally employs deceptive methods to enter the Operating System like spam emails, infected media devices, peer to peer file sharing, free downloads and so on. Ads by SpeedyCar once installed on your Operating System, starts it execution automatically. You will not be able to know that virus has attacked your Operating System because it silently enters your Operating System.
After invading your Operating System, it can make your files and other documents inaccessible. It can make your Operating System slow and sluggish. Applications or programs may freeze or hang. Therefore, it is very important to Uninstall this malware if you find it on your Operating System.

Part 1 : Steps To Open Your Operating System In Safe Mode
Part 2 : Uninstall Ads by SpeedyCar From Chrome
Part 3 : Uninstall Ads by SpeedyCar From Task Manager
Part 4 : Uninstall Ads by SpeedyCar From Registry Entry
Part 5 : Uninstall Ads by SpeedyCar From Control Panel
Complete Removal Guide For Ads by SpeedyCar From Operating System
Part 1 : Steps To Open Your Operating System In Safe Mode
In Windows XP/Vista/7 :
- Goto Start menu - > Restart button.
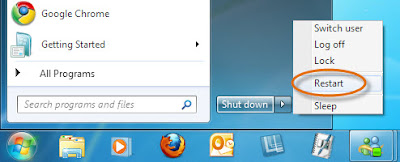
- Continue to press F8 button when your Operating System starts booting-up.
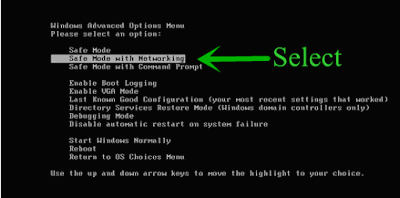
- Here, you will find Advance boot menu window on your Operating System screen.
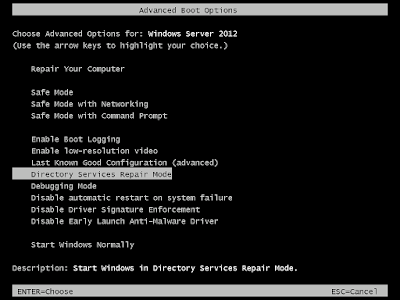
- Select Safe Mode With Networking Option and hit Enter key.
In Windows 8/10 :
- Click on Start menu press Shift key and click on Restart button.
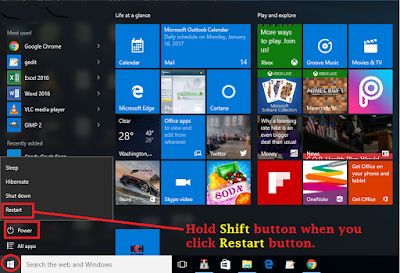
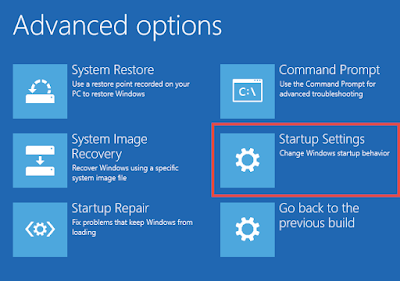
- Select Troubleshoot option -> Advanced.
- Click on Startup Settings.
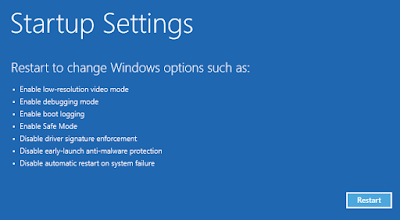
- Select Enable Safe Mode option.
- Click Restart button.
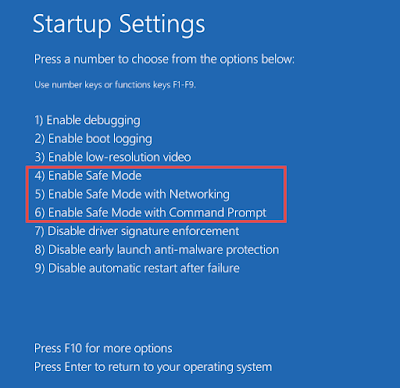
- Press F5 button to use Safe Mode With Networking option.
Part 2 : Uninstall Ads by SpeedyCar From Chrome
Uninstall Ads by SpeedyCar From Internet Explorer
- You can click on gear icon present at the right-top corner of the browser to open menu.
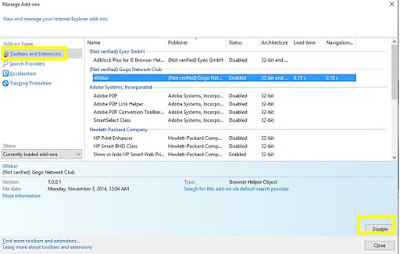
- Click on Manage Add-ons.
- Select Toolbars and Extensions tab..
- Select unwanted add-ons particularly related to Ads by SpeedyCar.
- Click on Disable button.
- Click on More information button.
- At last, click on Uninstall button to finally Uninstall the virus.
Uninstall Ads by SpeedyCar From Mozilla Firefox
- Launch Mozilla Firefox browser on your Operating System.
- Click on Menu button at the top right corner of the browser.
- Click Add-ons.
- Goto Add-ons Manager tab.
- In the Add-ons Manager tab, select Extensions or Appearance panel.
- Select Ads by SpeedyCar add-ons you want to Uninstall.
- Click the Uninstall button and restart your Operating System if any pop up asks you to restart.

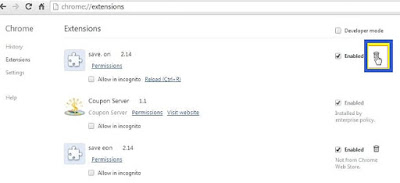
Uninstall Ads by SpeedyCar From Google Chrome
- Click on gear icon present at the top right corner of the window to open Chrome menu.
- Click on the Tools option - > Extension tab.
- Locate unwanted extensions related to Ads by SpeedyCar.
- At last, click on trash bin icon to Uninstall Ads by SpeedyCar.
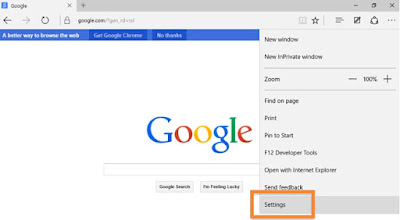
Uninstall Ads by SpeedyCar From Microsoft Edge
- Click on More (...) icon at the top right corner and goto Settings option.
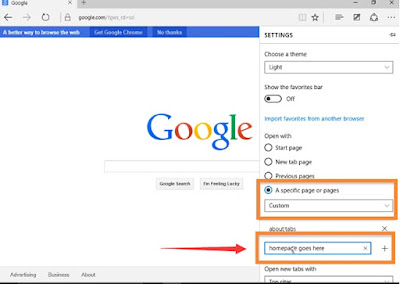
- Here, click on A specific page or pages option under the Open with option.
- Select Custom and enter URL which you want to set as your browser's default homepage.
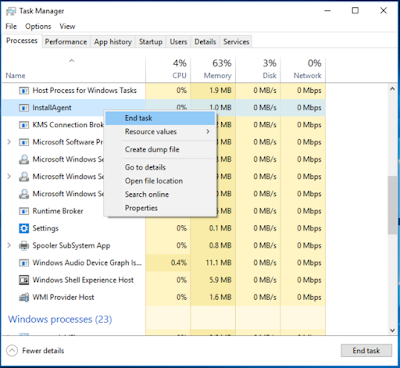
Part 3 : Uninstall Ads by SpeedyCar From Task Manager
- Press ALT+Ctrl+Del keys simultaneously.
- Select and click on Task manager option.
- Locate out unwanted process.
- Click on End Task button.
Part 4 : Uninstall Ads by SpeedyCar From Registry Entry
- Press Win + R keys altogether to open run dialog box.
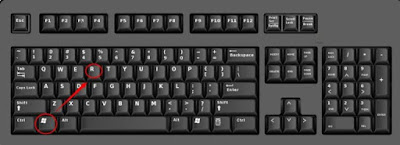
- Type regedit in the dialog box.
- Press OK button.
- Select and Uninstall entries related to Ads by SpeedyCar.
HKEY_LOCAL_MACHINESYSTEMCurrentControlSetServicesWpm
HKEY_CURRENT_USERSoftwareMicrosoftInternet ExplorerMain “Default_Page_URL”
HKEY_LOCAL_Machine\Software\ClassesAds by SpeedyCar
HKEY_CURRENT_USER\Software\Microsoft\Windows\CurrentVersion\Run “.exe”
HKCU\Software\Microsoft\Windows\CurrentVersion\Internet Settings\random
HKEY_LOCAL_MACHINE\SOFTWARE\Microsoft\Windows\CurrentVersion\run\random
HKEY_CURRENT_USER\Software\Microsoft\Windows\CurrentVersion\Internet Settings “CertificateRevocation” = ’0
Part 5 : Uninstall Ads by SpeedyCar From Control Panel
Uninstall Ads by SpeedyCar From Windows XP
- Click on Start icon. A list will be appeared.
- Click on Control Panel.

- Click on Add or Uninstall programs option.
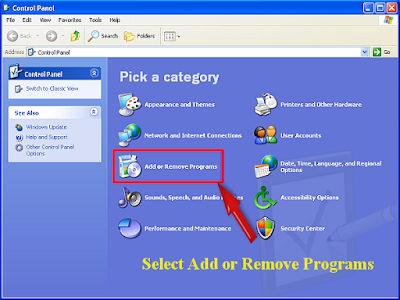
- Select and Uninstall unwanted programs running on your Operating System.
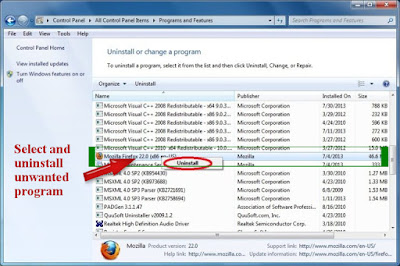
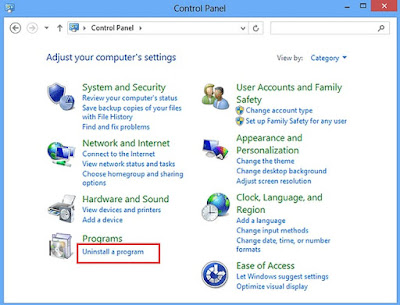
Uninstall Ads by SpeedyCar From Windows 7
- Click on Start button.
- Click on Control Panel present in start menu.
- Click on Uninstall a Program.
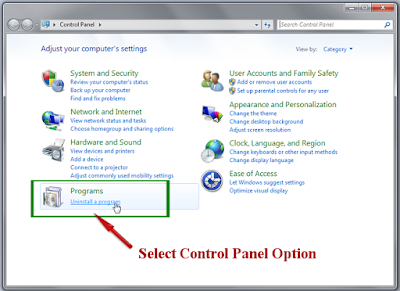
- Then, Uninstall malicious programs running in your Operating System.
Uninstall Ads by SpeedyCar From Windows 8
- Press Win+R button simultaneously to open Run dialog box.

- Type control panel in Run dialog box.

- Press Enter key to open Control Panel window.
- Click on Uninstall a Program.
- Right-click on Ads by SpeedyCar and its related programs.
- Click on Uninstall.
Uninstall Ads by SpeedyCar From Windows 10
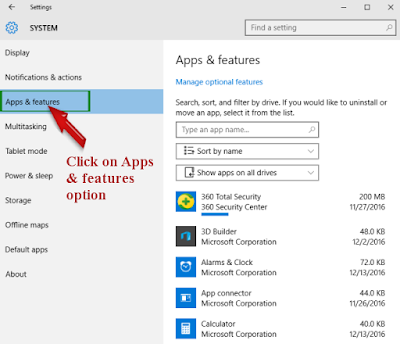
- Click on Start button and choose Settings option.
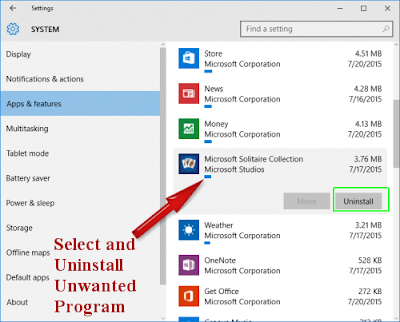
- Click on System option -> Apps and Features.
- Under Apps and Features tab, locate undesirable program.
- Click on Uninstall button.
No comments:
Post a Comment